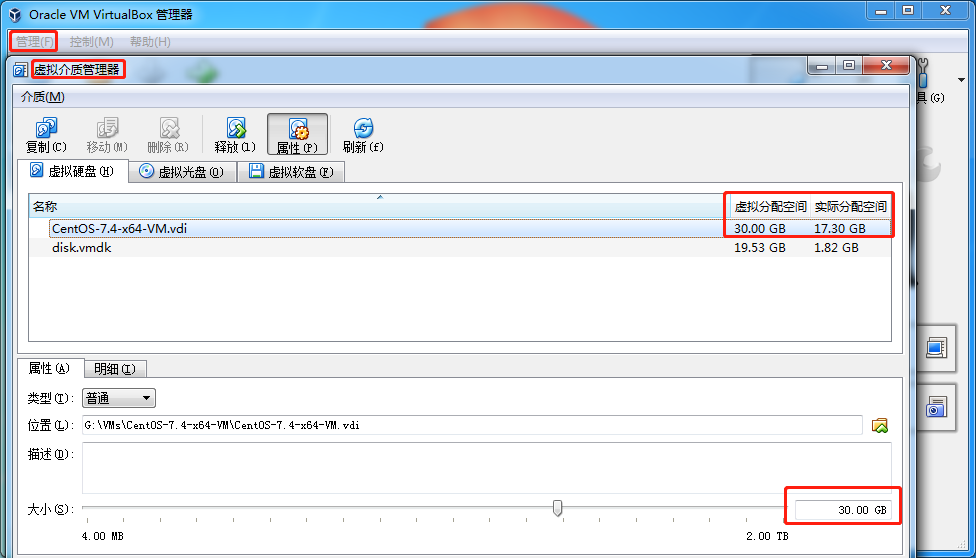
有时候使用虚拟机,难免会遇到创建时设置的硬盘空间过小的情况,这里记录下自己的一个虚拟机空间扩展过程。
1.在 Virtualbox 中扩展虚拟机硬盘空间

一图胜千言
2.虚拟机内 Linux 根分区空间扩充
步骤1中只是扩展了虚拟分配空间,还需要在 Linux 系统内进行扩充分配,否则系统无法识别到。
fdisk /dev/sda
输入 m 帮助提示。
根据提示输入 n。
选择 p,(这里不能选择e,不然后面的操作会受阻)。
选择分区号:3。
按照 提示分别输入起始扇区和默认扇区(直接回车使用默认值即可)。
然后输入 t 来改变磁盘的 system id。
然后选择 8e 将分区类型修改为Linux LVM(可以执行fdisk -l,能看见原有的磁盘 id 就为 8e)。
再输入w退出(会提示设备忙。。。),此操作后需要 reboot 重启linux。
重启后执行fdisk -l查看设备 Boot(我的为/dev/sda3,如果不一致请注意修改),再执行如下命令:
# 将分区格式化为ext4格式
mkfs.ext4 /dev/sda3
# 创建新的物理分区
pvcreate /dev/sda3
查看LVM信息的命令:
# 查看物理卷
pvdisplay
# 查看虚拟卷
vgdisplay
# 查看逻辑卷
lvdisplay
使用命令vgdisplay可以看见如下内容。
[root@centos7vm /]# vgdisplay
  --- Volume group ---
  VG Name               centos
  System ID
  Format                lvm2
  Metadata Areas        2
  Metadata Sequence No  5
  VG Access             read/write
  VG Status             resizable
  ...
再执行vgextend centos /dev/sda3,扩展分区到卷组
centos便是上面展示中的VG Name
再执行lvdisplay,根据大小判定/dev/centos/root即是根分区,执行lvextend /dev/centos/root /dev/sda3扩展逻辑卷空间到根分区。
[root@centos7vm /]# lvdisplay
  --- Logical volume ---
  LV Path                /dev/centos/root
  LV Name                root
  VG Name                centos
  LV UUID                g228hY-rIZ2-jok8-0pFP-P7R1-cuag-yneZF3
  LV Write Access        read/write
  LV Creation host, time centos7vm, 2019-05-13 10:32:12 +0800
  LV Status              available
  # open                 1
  LV Size                26.99 GiB
  Current LE             6910
  Segments               2
  Allocation             inherit
  Read ahead sectors     auto
  - currently set to     8192
  Block device           253:0
使用命令resize2fs /dev/centos/root,刷新逻辑分区容量。
如果报错则是因为你的某些分区使用的是 xfs 的文件系统,执行
xfs_growfs /dev/centos/root刷新逻辑分区即可。
执行df -h,会发现根分区容量变大了,至此已经成功扩展了根分区。
最后reboot重启一下就大功告成了!

评论区