系列笔记:
- SpringBoot实战(1)-Spring 4.x
- SpringBoot实战(2)-Spring MVC 4.x
- SpringBoot实战(3)-Spring Boot
- SpringBoot实战(4)-Spring Boot Web&Data
- SpringBoot实战(5)-Spring Boot 企业级开发
- SpringBoot实战(6)-Spring Boot 开发部署与测试
- SpringBoot实战(7)-Spring Boot 应用监控
- SpringBoot实战(8)-Spring Boot 分布式系统开发
先来几个图
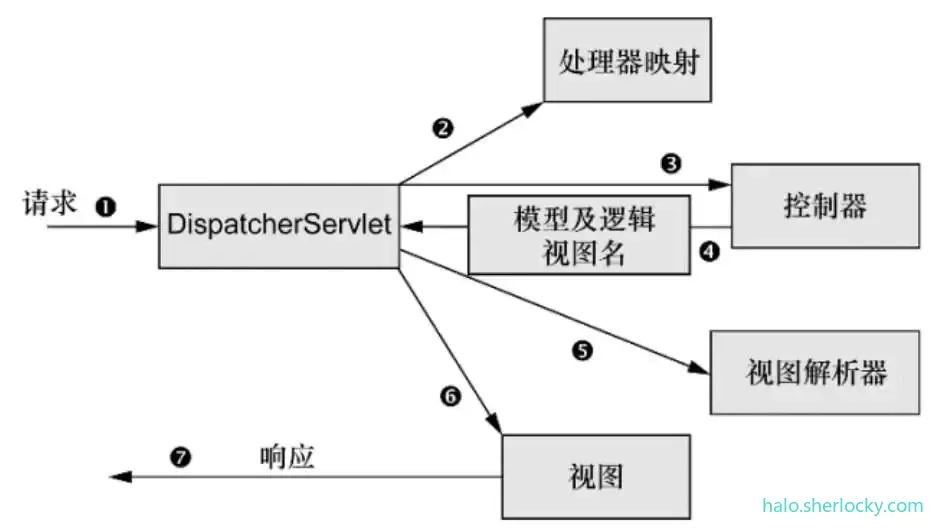
SpringMVC执行流程:

图片来自:肥朝,感谢,如侵联删。
DispatcherServlet 继承图:
Spring MVC
- MVC:Model + View + Controller (数据模型+视图+控制器)。
- 三层架构:Presentation tier + Application tier + Data tier (展现层 + 应用层 + 数据访问层)
实际上 MVC ==只存在三层架构的展现层==,M 实际上是数据模型,是包含数据的对象(Spring MVC里有一个专门的类Model用来和V之间的数据交互)。V 指的是视图页面(JSP,freemarkr,Velocity。。。),C 就是控制器(@Controller)。
而三层架构是整个应用的架构,是由Spring框架负责管理的。一般项目结构中都有Service层和DAO层,这两个反馈在应用层和数据访问层。
WEB 配置:
import javax.servlet.ServletContext;
import javax.servlet.ServletException;
import javax.servlet.ServletRegistration.Dynamic;
import org.springframework.web.WebApplicationInitializer;
import org.springframework.web.context.support.AnnotationConfigWebApplicationContext;
import org.springframework.web.servlet.DispatcherServlet;
// WebApplicationInitializer 是 Spring 提供用来配置Servlet 3.0+配置的接口,从而实现了替代web.xml的位置,实现此接口将会自动被 SpringServletContainerInitializer (用来启动 Servlet 3.0 容器)获取到。
public class WebInitializer implements WebApplicationInitializer {
	@Override
	public void onStartup(ServletContext servletContext)
			throws ServletException {
		AnnotationConfigWebApplicationContext ctx = new AnnotationConfigWebApplicationContext();
        ctx.register(MyMvcConfig.class);
        // 新建 WebApplicationContext,注册配置类,并将其和当前 servletContext 关联
        ctx.setServletContext(servletContext);
        // 注册 Spring MVC 的 DispatcherServlet
        Dynamic servlet = servletContext.addServlet("dispatcher", new DispatcherServlet(ctx));
        servlet.addMapping("/");
        servlet.setLoadOnStartup(1);
        servlet.setAsyncSupported(true);//1
	}
}
@RestController
是一个组合注解,组合了 @Controller 和 @ResponseBody。
静态资源映射
Spring MVC 的定制配置需要我们的配置类继承一个 WebMvcConfigurerAdapter 类并重写一些方法,一定要使用 @EnableWebMvc 注解开启 SpringMVC 支持。
Spring 5.0+ 已被标位废弃,推荐使用实现 WebMvcConfigurer 接口。
通过重写 addResourceHandlers(ResourceHandlerRegistry registry) 方法可配置静态资源映射。
@Override
public void addResourceHandlers(ResourceHandlerRegistry registry) {
    registry.addResourceHandler("/assets/**").addResourceLocations("classpath:/assets/");
}
拦截器配置
拦截器(Interceor)实现对一个请求处理前后进行相关的业务处理,类似于Servlet的Filter。
通过重写 addInterceptors(InterceptorRegistry registry) 方法来注册自定义的拦截器。
可以让普通的Bean实现 HandlerInterceptor 接口或者继承 HandlerInterceptorAdapter 类,并重写 preHandle() 和 postHandle() 等方法,来实现自定义拦截器。
@ControllerAdvice
通过@ControllerAdvice(组合了@Component注解),我们可以将对于控制器的全局配置放置在同一个位置,注解了@Controller的类的方法可以使用@ExceptionHandler、@InitBinder、@ModelAttribute 注解到方法上,这对所有注解了 @RequestMapping 的控制器内的方法有效。
- @ExceptionHandler : 用于全局处理控制器里的异常(通过value属性可以过滤拦截的条件)。
- @InitBinder :用来设置 WebDataBinder,WebDataBinder用来自动绑定前台请求参数到Model中(可对request中的参数做特殊处理)。
- @ModelAttribute :绑定键值对到 Model 中(在 @Controller 中可通过 @ModelAttribute 取到对应值)。
ViewController
对于大量无任何业务处理制作简单页面转向的情况,可以通过在配置类中重写 WebMvcConfigurerAdapter.addViewControllers(ViewControllerRegistry registry)方法来简化配置。
在SpingMVC中,路径参数如果带“.”的话,“.”后面的值将被忽略。
通过重写 configurePathMatch(PathMatchConfigurer configurer) 可以覆盖默认配置,以获取到“.”后面的值。
@Override
public void configurePathMatch(PathMatchConfigurer configurer) {
    configurer.setUseSuffixPatternMatch(false);
}
文件上传
SPringMVC通过配置一个 MultipartResolver 来上传文件。在控制器中,通过 MultipartFile file 来接收文件,通过 MultipartFile[] files 来接收多个文件上传。
可以使用 FileUtils.writeByteArrayToFile() 快速写文件到磁盘
@RequestMapping(value = "/upload",method = RequestMethod.POST)
public @ResponseBody String upload(MultipartFile file) {//1
		try {
			FileUtils.writeByteArrayToFile(new File("e:/upload/"+file.getOriginalFilename()),
					file.getBytes()); //2
			return "ok";
		} catch (IOException e) {
			e.printStackTrace();
			return "wrong";
		}
}
自定义 HttpMessageConverter
通过实现 AbstractHttpMessageConverter 接口可以实现自定义的 HttpMessageConverter。
配置自定义的 HttpMessageConverter 的Bean,在SPringMVC里注册 HttpMessageConverter 有两个方法:
- configureMessageConverters:重写会覆盖掉 SpringMVC 默认注册的多个 HttpMessageConverter
- extendMessageConverters:仅添加一个自定义的HttpMessageConverter,不覆盖默认注册的HttpMessageConverter。
服务器端推送技术
书中服务器端推送方案基于:当客户端想服务器发送请求,服务端会抓住这个请求不放,等有数据更新的时候才返回给客户端,当客户端接收到消息后,再向服务器发送请求,周而复始。可以减少服务器的请求数量,大大减少服务器压力。个人理解就是长连接。
基于SSE(Server Send Event ==服务端发送事件==)的服务器端推送(需要现代浏览器支持)
    @Controller
    public class SseController {
        @RequestMapping(value = "/push", produces = "text/event-stream") //1
        public @ResponseBody String push() {
            Random r = new Random();
            try {
                Thread.sleep(5000);
            } catch (InterruptedException e) {
                e.printStackTrace();
            }
            return "data:Testing 1,2,3" + r.nextInt() + "\n\n";
        }
    }
这里使用输出的媒体类型为 ==text/event-stream==,这是服务器端SSE的支持,在浏览器端同样需要客户端支持—— EventSource,可以添加SSE客户端监听,以获取服务器推送的消息。
js 端示例:
<script type="text/javascript">
 if (!!window.EventSource) {
	   var source = new EventSource('push');
	   s='';
           // 添加 SSE 客户端监听,再次获取服务端推送的消息
	   source.addEventListener('message', function(e) {
		   s+=e.data+"<br/>";
		   $("#msgFrompPush").html(s);
	   });

	   source.addEventListener('open', function(e) {
	        console.log("连接打开");
	   }, false);

	   source.addEventListener('error', function(e) {
	        if (e.readyState == EventSource.CLOSED) {
	           console.log("连接关闭");
	        } else {
	            console.log(e.readyState);    +

	        }
	   }, false);
	} else {
	        console.log("你的浏览器不支持SSE");
	}
</script>
基于Servlet 3.0+ 的异步方法特性(跨浏览器)
需要显式的开启异步支持(servlet.setAsyncSupported(true))。
异步任务的实现是通过控制器从另外一个线程返回一个 DeferredResult。
js 端可以使用jQuery的Ajax请求:
<script type="text/javascript">
	deferred();//1 页面一打开就向后台发送请求。
	function deferred() {
	    $.get('defer',function(data){
	        console.log(data); // 2
	        deferred(); // 3 一次请求完成后再向后台发送请求。
	    });
	}
</script>
SpringMVC 的测试
Spring MVC 单元测试示例:
import static org.springframework.test.web.servlet.request.MockMvcRequestBuilders.get;
import static org.springframework.test.web.servlet.result.MockMvcResultMatchers.content;
import static org.springframework.test.web.servlet.result.MockMvcResultMatchers.forwardedUrl;
import static org.springframework.test.web.servlet.result.MockMvcResultMatchers.model;
import static org.springframework.test.web.servlet.result.MockMvcResultMatchers.status;
import static org.springframework.test.web.servlet.result.MockMvcResultMatchers.view;
import org.junit.Before;
import org.junit.Test;
import org.junit.runner.RunWith;
import org.springframework.beans.factory.annotation.Autowired;
import org.springframework.mock.web.MockHttpServletRequest;
import org.springframework.mock.web.MockHttpSession;
import org.springframework.test.context.ContextConfiguration;
import org.springframework.test.context.junit4.SpringJUnit4ClassRunner;
import org.springframework.test.context.web.WebAppConfiguration;
import org.springframework.test.web.servlet.MockMvc;
import org.springframework.test.web.servlet.setup.MockMvcBuilders;
import org.springframework.web.context.WebApplicationContext;

@RunWith(SpringJUnit4ClassRunner.class)
@ContextConfiguration(classes = {MyMvcConfig.class})
// @WebAppConfiguration 注解在类上,用来声明加载的 ApplicationContext 是一个 WebApplicationContext ,他的属性指定的是Web资源的位置,默认为("src/main/webapp")
@WebAppConfiguration("src/main/resources")
public class TestControllerIntegrationTests {
	private MockMvc mockMvc;
	@Autowired
	private DemoService demoService;// 测试用例中可以注入Spring的Bean
	@Autowired
	WebApplicationContext wac; // 可注入 WebApplicationContext
	@Autowired
	MockHttpSession session; // 可注入模拟的 http session
	@Autowired
	MockHttpServletRequest request; // 可注入模拟的 http request

	@Before
	public void setup() {
            // 模拟MVC对象,初始化
            mockMvc = MockMvcBuilders.webAppContextSetup(this.wac).build(); //2
	}
	@Test
	public void testNormalController() throws Exception {
		mockMvc.perform(get("/normal")) // 模拟get请求
				.andExpect(status().isOk())// 预期返回200
				.andExpect(view().name("page"))
				.andExpect(forwardedUrl("/WEB-INF/classes/views/page.jsp"))
				.andExpect(model().attribute("msg", demoService.saySomething()));
	}
	@Test
	public void testRestController() throws Exception {
		mockMvc.perform(get("/testRest"))
				.andExpect(status().isOk())
				.andExpect(content().contentType("text/plain;charset=UTF-8"))
				.andExpect(content().string(demoService.saySomething()));
	}
}

评论区